

How I Edit Supercross Photos: Workflow, Culling, and Style Tips
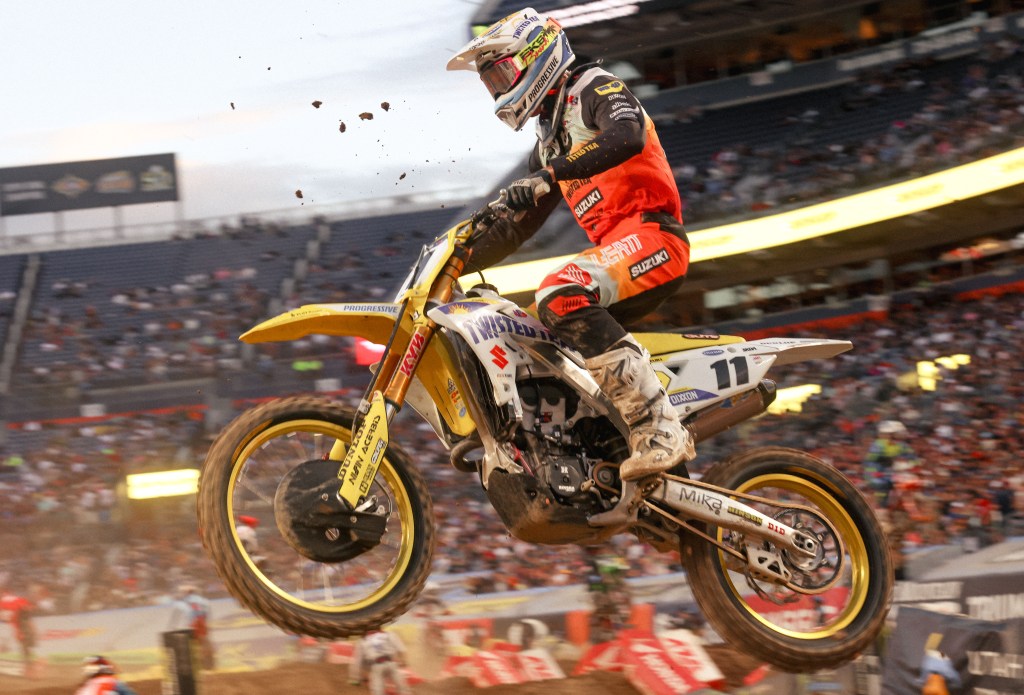
There’s something addicting about shooting Supercross—the speed, the dirt, the golden hour glow hitting the riders just right. It’s one of my favorite things to capture. But what most people don’t see is the behind-the-scenes process that happens after the last checkered flag. Shooting Supercross is only half the job—editing is where the story really comes together.
After Denver, I had over 2,000 images from media day, qualifiers, and the main events. Sorting, culling, and editing is a time-consuming but crucial part of making these photos stand out and keeping the energy of race night alive. If you’ve ever wondered how I get from thousands of raw dirt bike photos to a finished gallery, here’s exactly how I do it—step by step, no secrets.
Step 1: Upload and Organize
As soon as I get home from the track, I upload everything to my computer and sort the photos into folders based on the event sections:
- Media Day
- Qualifying
- Fan Fest
- KTM Juniors
- Main Events
Having them separated from the start makes it easier for me to focus on one part of the day at a time without getting overwhelmed.
If you’re curious about the full Supercross Denver experience at Empower Field, you can explore my Supercross Denver 2025 Hub where I break down each of these sections.
Step 2: The First Cull
Once in Lightroom, I go through each folder and rate every photo:
- ⭐ 1 Star: Blurry, badly exposed, or just a miss. These get deleted or pushed off to the side, never be looked at again. (I call 1 starred photos “the void”)
- ⭐⭐⭐ 3 Stars: Possibly salvageable with cropping or editing, but not immediately the best of the best. I may or may not look back at these. It depends on how many better photos I get. These are just there in case I need them, but I usually hope I won’t.
- ⭐⭐⭐⭐⭐ 5 Stars: The ones that catch my eye right away—shots that make me go “Oh yeah, that’s the one”
I also sometimes mark the best of the best with a check mark during this first pass. These are the photos that are worth a second, closer look sooner. During the first pass through, if there is a photo that is amazing amazing and it catches my eye, I’ll give it 5 stars and a check mark, and these will often be the first photos that I post, teasers, previews, or something along those lines.
At this point, my folder usually breaks down to something like:
- 25% = 1 Star (Trash)
- 50% = 3 Stars (Maybe)
- 25% = 5 Stars (Good)
- ~2% = Check Marks (Potential Best of the Best)
Step 3: The Second Cull
Next, I sort by 5 stars only and go through them again. This is when I get brutal. I either check them (keepers) or X them (cut). Usually, about 70% get an X and 30% get a check mark.
I start editing from the 5-star check marks first.
Step 4: First Edits – Straighten, Crop, Fix Basics
I pick my top three photos from this selection—shots that have a variety of lighting or framing—and begin my base edits:
- Straighten horizons
- Crop to improve composition
- Auto exposure tweaks
- Brighten shadows
- Dehaze if the photo is too washed out
These edits are just about fixing what’s wrong, not about adding style yet.
Step 5: Healing Brush
I don’t do much retouching for Supercross photos, but sometimes I’ll:
- Remove distracting chunks of dirt
- Heal out a track pole if it’s awkwardly in frame
For the most part, I keep it natural and leave a little bit of track chaos—it’s part of the sport.
Step 6: Finding My Style for the Gallery
This is the fun part. I’ll take one of those top three photos and create several versions with different styles:
- Desaturated reds
- Matte blacks
- Vintage tones
- Bright and airy
- Warm golden hour glow
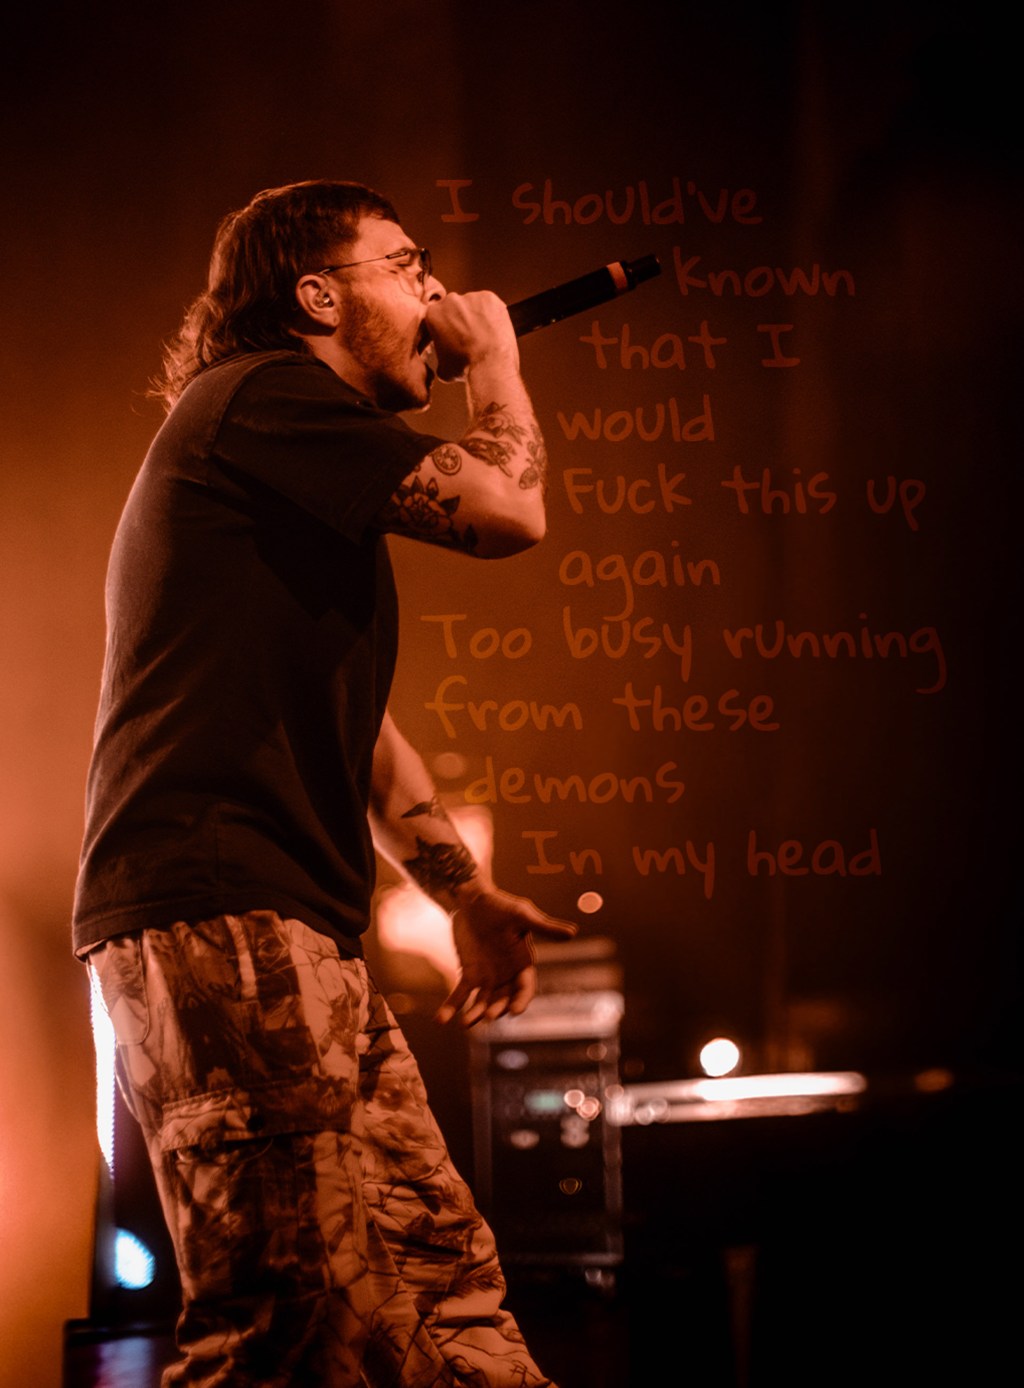
Once I find a look I love, I create a preset and apply it to 5-10 photos to see how it holds up. If you want to see how this editing style looks in the final gallery, check out my Top 15 Favorite Photos from Supercross Denver 2025.

Step 7: Full Gallery Editing Workflow
With the preset locked in, I go back to my 5-star check mark photos and fully edit each one:
- Straighten and crop
- Auto exposure and dehaze
- Brighten shadows, darken blacks
- Matte out the blacks with a subtle S-curve
- Warm up the midtones and highlights in color grading
- Selective color edits:
- Desaturate colors not used to enhance the image
- Drop blues if there’s no blue in the photo
- Selectively adjust gold tones depending on the outfit
Step 8: Texture and Grain
I love adding heavy grain to my dirt bike photos. Supercross is gritty, fast, and a little rough—it makes sense to lean into that with big, rugged grain.
Step 9: Subject and Background Masks
This is where I will select the subject to make them pop and stand out from the background
- Select the subject, bring up the clarity, texture, shadows, and sharpening.
- Select the background, bring down the saturation, lower the blacks, slightly lower the shadows,lower the texture or clarity depending on style desired.
Step 10: Radial and Linear Masks
This is where I emphasize the light:
- Add a radial mask to the sunlit parts of the rider to bring in warmth and highlights. If there are no sunlight parts of the rider, I’ll add a radial mask to the top of the image or to the top corner of the image to create the illusion of sunlight that isn’t actually there.
- Apply a linear gradient to the bottom of the photo to darken and dehaze the track—otherwise, the ground often looks too bright or washed out.
Step 11: Fine Tuning
Now I check:
- Did the preset make parts of the photo too dark?
- Are the number plates readable?
- Are the shadows on the rider’s face too deep?
I’ll use spot brushes to:
- Brighten key areas like faces, bikes, or logos
- Add contrast to number plates or logos to make them pop
- Whiten whites and deepen blacks selectively
- Avoid lowering highlights unless absolutely necessary
Step 12: Review and Adjust
Once I’ve gone through all the photos, I start over at photo 1.
I’ll make final tweaks—little things I missed or anything that feels off now that the full gallery is coming together.
Step 13: The Most Important Step – WALK AWAY
Seriously. Go take a break. At this point, I’ve probably been editing for hours and I’m no longer seeing the photos clearly. Editing blindness is real. I always step away for at least 30 minutes to an hour, or as long as overnight.
When I come back, I can instantly tell what needs to be fixed.
Fresh eyes make a huge difference. Sometimes I will be thinking, “Oh god, what was I thinking when I was editing these last night!” And that’s why it is so important to walk away and come back with a fresh perspective.
Step 14: Final Tweaks
I go back through the gallery one last time. Now I’m looking for:
- Consistency in color and exposure
- Little distractions I missed
- Any photo that doesn’t hold up to the rest so I can remove it from the gallery
I’ll back out of the photos in full frame mode and look at them in thumbnail form. Do they look cohesive together? Do they look repetitive? Do I have a nice variety? Do the colors all go together and suit each other?
- If I have individual photos that stand out from the rest editing-wise, I’ll go back and fix that photo to match the vibe of the rest of the photos.
- If I have too many photos taken from the same spot on the track, I’ll pick only the top 1-2 and get rid of the rest, no matter how good the rest are.

Once that’s done—voila! The gallery is ready.
Quick Recap: My Supercross Editing Flow
- Cull (First Pass) – Star ratings: 1 (trash), 3 (maybe), 5 (good), check marks for the best
- Cull (Second Pass) – Check mark or X on 5-star photos
- Straighten and Crop
- Auto Edits + Fix Exposure/Dehaze
- Healing Brush as Needed
- Create Presets/Stylistic Edits
- Edit Full Gallery with Preset
- Add Texture and Grain
- Subject and Background Masks
- Radial and Linear Masks for Light
- Spot Brushes for Fine Details
- Final Full Gallery Review
- Take a Break
- Final Tweaks
This is my full process from memory card to final gallery. It’s what works for me, and it lets me find my best shots, develop a consistent style, and keep the editing process manageable without feeling overwhelmed.
If you’re an event photographer, I’d love to know—what’s your culling and editing process like? Do you do something similar or totally different?
Let’s talk culling and editing! Was there anything that surprised you about the culling and editing process? Any tips or ideas you have for me? Drop your process in the comments!
Want to see how these edits come to life? Check out My Top 15 Favorite Photos from Supercross Denver 2025. You can also explore more stories, photo tips, and race coverage over on the Supercross Denver 2025 Hub.
More posts you might like:
• The Ultimate Supercross Photography Checklist
• Best Camera Settings for Dirt Bike Photography
• What It’s Like to Shoot Supercross with the Canon RF 100mm f/2.8L Macro

3 responses to “How I Cull and Edit My Supercross Photos: My Full Process”
[…] How I Cull and Edit Supercross Photos: My Full Workflow […]
LikeLike
Neat! There’s a lot of things (maybe not so many) that go over my head mainly because my process atm is just so stupidly simple that I cull whatever photos that also don’t feel right right off the bat lol. I’ll maybe change the temp, sharpness a bit and straighten it out if need be. But since my own shooting process is “How can I take this photo exactly how the object in front of me looks?” I’d be lying if I said that’s 100% the case cause I always add a little moodiness to it. 2000 photos is bonkers to go over but I think after all the work is done, the results are great! Plus it’s fun just adding different filters and things to photos and just seeing what sticks and feels right and, like you said, creating a template and seeing how it applies to the other photos you’ve taken.
The process is consuming but the end result is GREAT.
LikeLike
[…] How I Cull and Edit My Supercross Photos: My Full Process […]
LikeLike