
Unlocking the Magic Behind the Lens
Ever wondered how photographers create dreamy, out-of-focus backgrounds or achieve pin-sharp focus on their subjects? The secret lies in one magical element of your camera: aperture. Whether you’re just starting out or you’ve dabbled in photography, understanding aperture can completely transform your images. In this post, I’ll break down the basics, share personal stories, and even highlight a few of my early fails. Let’s dive in!
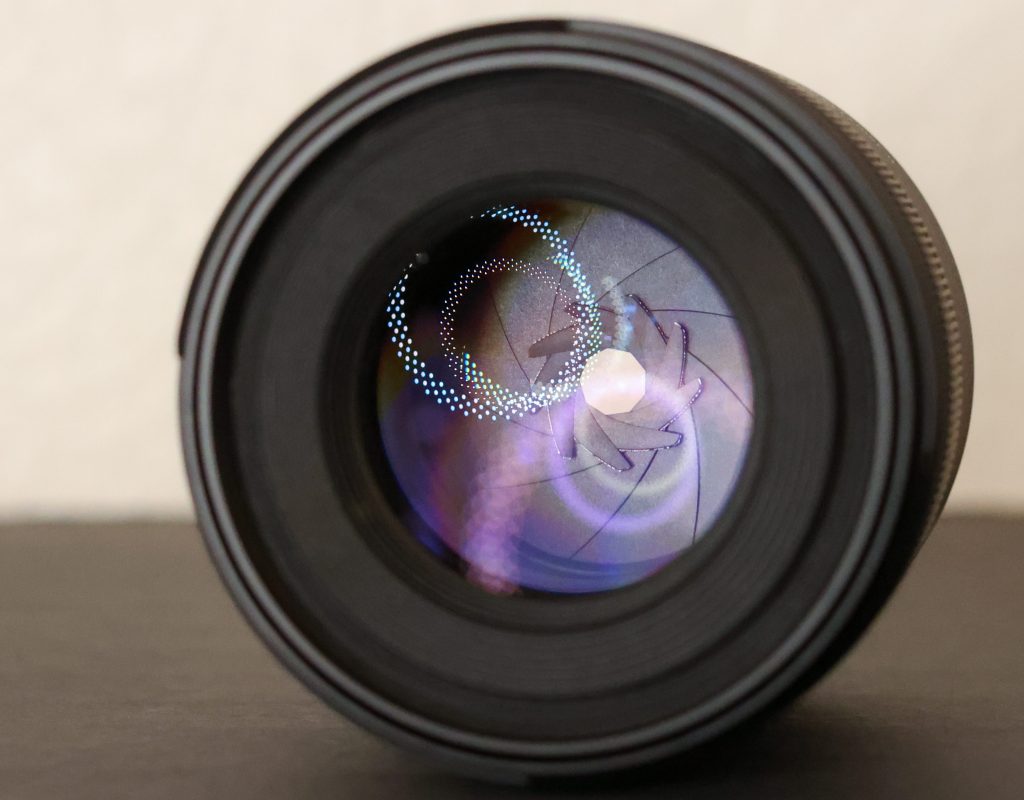
What is Aperture?

Aperture is like the pupil of your camera’s eye. It’s an adjustable opening in your lens that controls how much light passes through to your camera’s sensor. Think of it as a window, the bigger the window, the more light floods in. In photography, aperture is measured in f-stops, like f/1.8, f/4.0, or f/16. Here’s how it works:
- Smaller f-number (e.g., f/1.8): A larger opening, letting in more light. This is great for low-light conditions and creating a shallow depth of field, which makes your subject pop against a beautifully blurred background.
- Larger f-number (e.g., f/16): A smaller opening, letting in less light. This gives you a deeper depth of field, making everything from the foreground to the horizon appear in focus. Perfect for those wide landscape shots.
When you use a wide aperture (like f/1.8), you allow more light to enter, making the image brighter. This is great for low-light situations, but it also makes the depth of field more shallow, which can blur the background and make your subject stand out more. On the other hand, using a narrow aperture (like f/16) reduces the amount of light entering and creates a sharper focus across the entire image, from foreground to background.
Why Aperture Matters: The Creative Impact
1. Depth of Field: The Magic of Focus
One of aperture’s coolest tricks is its ability to control depth of field, or how much of your photo is in focus. A wide aperture (low f-number) creates a shallow depth of field, which makes your subject pop against a beautifully blurred background.
Storytime: One crisp fall evening, I decided to rake up a pile of leaves in the backyard for Remy to play in. As the golden hour light filtered through the trees, he plopped himself right in the middle of the pile, looking perfectly content. I knelt down with my camera, set my aperture to f/2.8, and focused on his nose. (oops, I meant to focus on his eyes) The background—a blend of autumn leaves and glowing sunlight—blurred into a stunning bokeh. That shot not only captured his beauty but also the warm, cozy vibes of that evening.
Golden Hour Photography: The Best Settings & Tricks for Perfect Shots

2. Exposure: Balancing the Light
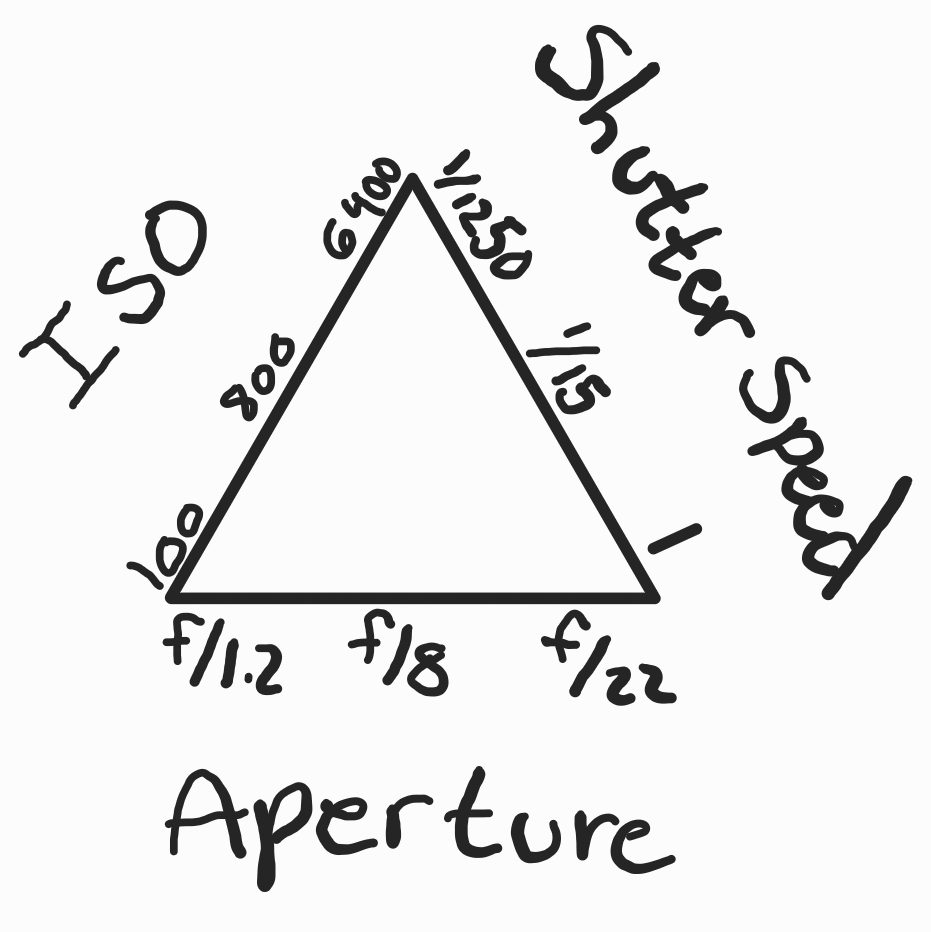
Aperture is also a key player in controlling your photo’s exposure. Alongside shutter speed and ISO, it’s part of the “exposure triangle” that helps you balance the lighting of a photo.
Example: During a dirt bike race, I had to adjust my aperture to keep up with the changing light. On sunny stretches, I used a smaller aperture (around f/8) to avoid overexposing the highlights. But in shaded areas, I opened up to f/2.8 to let in more light. This balance ensured my shots were well-exposed, even in tricky lighting.
What is Exposure in Photography? (Simple Guide for Beginners)
How to Use Aperture in Your Photography
Portraits: Make Your Subject Shine
When shooting portraits, a wide aperture (like f/1.8) helps isolate your subject, creating that creamy bokeh effect. This is my go-to for capturing Remy’s expressions. It’s also fantastic for human portraits, those genuine smiles stand out beautifully against a soft, blurred background.
Mastering Bokeh: How Aperture, Focal Length, and Distance Affect Background Blur
Now that you know how aperture works for portraits, let’s dive into how it affects your landscape shots.
Landscapes: Bring Everything into Focus
For landscapes, a smaller aperture (like f/8 or f/11) is ideal. It gives you a deeper depth of field, so everything from the foreground to the horizon is sharp and detailed.
Using a smaller aperture also reduces the risk of blown-out highlights, especially in bright, high-contrast scenes like sunsets or mountain vistas.
Tips for Experimenting with Aperture
1. Play with Different f-Stops
Grab your camera and try shooting the same subject at various f-stops and notice how the background changes from a soft blur to sharper detail. Play around with apertures when shooting in different lighting conditions to see how your exposure and depth of field are affected.
2. Use Aperture Priority Mode
Most cameras have an aperture priority mode (Av or A on the mode dial). This mode lets you control the aperture while your camera adjusts the shutter speed. It’s perfect for learning how different apertures affect your photos.
Mistakes I’ve Made (and What I Learned)
- Relying Too Much on Wide Apertures: Early on, I thought wide apertures were the answer to everything. But I ended up with soft or blurry group photos where not everyone was in focus. Now I’m mindful of using smaller apertures (like f/4 or f/5.6) for group shots or for when I am trying to get more of someones face in focus.
- Forgetting to Adjust for Bright Light: On a sunny day, I once shot at f/1.4 without checking my settings. The photos were completely overexposed because I was letting too much light in. Always double-check your light conditions and adjust your settings accordingly.
- Not Testing Enough: I used to stick to just one aperture setting because it felt safe. Now, I change the aperture for almost every photo I take. You’ll be amazed at what you can create by stepping out of your comfort zone and increasing your knowledge.
Conclusion
Aperture is more than just a technical setting, it’s a gateway to creativity. It controls how light interacts with your photos, how much is in focus, and the overall mood of your image. Whether you’re capturing a serene golden hour moment or the thrill of a dirt bike race, mastering aperture gives you the tools to elevate your photography.
So grab your camera, head outside, and start experimenting! And remember, it’s okay to make mistakes, they’re part of the learning process. After all, Henri Cartier-Bresson once said, “Your first 10,000 photographs are your worst,” and I have proved that to be very true (lol). The only way to get better is to get out there and get your first 10,000 photos out of the way!
Mastering aperture isn’t just about getting the technical details right, it’s about understanding how to use that control to tell your story. Whether you want a dreamy portrait with a blurred background or a breathtaking landscape with everything in focus, aperture is the key to bringing your vision to life.
Anyways,
What’s your favorite aperture setting? Do you have a go-to technique or a funny fail like mine? Share your stories in the comments below! And if you’re hungry for more tips, check out my other posts here for photography insights.
Thanks for reading :) I hope I taught you something new today :) Byeeee


11 responses to “What is Aperture in Photography?”
Incredibly interesting! I like how you explained the technicality of it and how the camera kinda work likes an eye, and like how when you adjust the aperture you’re letting in as much light as you can to improve the shot. I also like how you briefly explained the importance of balancing light! The fact you can control the light in your photo’s and adjust as you go. Almost as if each picture is different! Love it. 🙂↕️
LikeLike
[…] (If you want to learn more about f-stop and aperture, you can read about that, here!) […]
LikeLike
[…] Aperture (f-stop) – Controls how much light enters the camera through the lens. Aperture also affects depth of field, or how much of the photo is in focus. A wider aperture (lower f-stop number) allows more light in, while a smaller aperture (higher f-stop number) lets in less light. […]
LikeLike
[…] all comes down to two major factors: aperture and focal length. Everything from the number of aperture blades in your lens to the shape of the […]
LikeLike
[…] reads: What is Aperture in Photography? or Mastering Bokeh: How Aperture, Focal Length, and Distance Affect […]
LikeLike
[…] all comes down to two major factors: aperture and focal length. Everything from the number of aperture blades in your lens to the shape of the […]
LikeLike
[…] (If you want to learn more about f-stop and aperture, you can read about that, here!) […]
LikeLike
[…] Aperture (f-stop) – Controls how much light enters the camera through the lens. Aperture also affects depth of field, or how much of the photo is in focus. A wider aperture (lower f-stop number) allows more light in, while a smaller aperture (higher f-stop number) lets in less light. […]
LikeLike
[…] What is Aperture in Photography? […]
LikeLike
[…] What is Aperture in Photography?: How to Master Lighting […]
LikeLike
[…] Aperture: For golden hour shots, I love using my Canon 50mm f/1.2. Its wide, f/1.2 aperture allows me to capture a lot of that warm, golden light. However, I find that shooting wide open at f/1.2 can sometimes let in too much light, especially during the early moments of golden hour unless my subject is very close. Because of this, I prefer to keep my aperture between f/1.2 and f/3.2 for portraits to get that beautiful, soft background while controlling the light. For landscape photography, I opt for a higher aperture, around f/8.0 or above, to ensure everything is sharp and in focus from foreground to background.What is Aperture in Photography? […]
LikeLike